- Visa Developer Community
- Forums
- Two-way SSL & X-Pay Token
- helloworld.js - How to run Node JS Sample Code usi...
- Subscribe to RSS Feed
- Mark Topic as New
- Mark Topic as Read
- Float this Topic for Current User
- Bookmark
- Subscribe
- Printer Friendly Page
helloworld.js - How to run Node JS Sample Code using the Hello World API and X-Pay-Token
- Mark as New
- Bookmark
- Subscribe
- Subscribe to RSS Feed
- Permalink
- Report Inappropriate Content
helloworld.js - How to run Node JS Sample Code using the Hello World API and X-Pay-Token
In this "How-to" guide we will show you how to run the “Hello World” project using Visa Hello World API and and API Key - Shared Secret Authentication. The Hello World API is a simple API for testing the connectivity with the Visa Network.
Important Links:
- The endpoint for the Hello World API is https://sandbox.api.visa.com/vdp/helloworld
- How to work with with API Key – Shared Secret (X-Pay-Token) https://developer.visa.com/pages/working-with-visa-apis/x-pay-token
- Login to Visa’s developer portal or sign up to https://developer.visa.com/
How to Create a Visa Developer Project
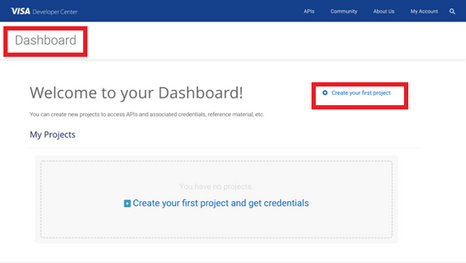
Before you are able to run the “Hello World” Project, you must create a Visa Developer Portal (VDP) project and get credentials. If you haven't registered yet just click on register here, fill out the account information, agree to the terms and conditions and click on receive emails. Once you have successfully activated your account, you will see your dashboard and you are ready to go.
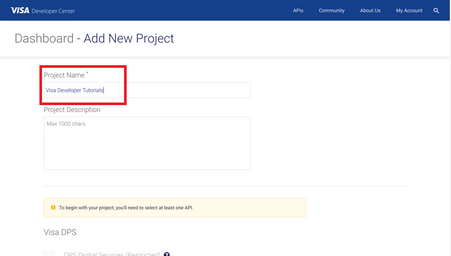
Once you are there, click on create your first project if this is your first project. On the next page, you will be asked for details, such as project name, description and a list of APIs to choose from.
For this tutorial, we're going to select CyberSource Payments and click create project.
How to get Credentials
After creating your project, you will be redirected to the project summary page. You can obtain your project credentials by browsing the left side navigation menu of your project and click on “Credentials”.
What is required for the X-Pay-Token Authentication?
To be able to make an API call with X-Pay-Token Authentication, you need to have the following:
- Api Key
- Secret Key
How to run the Node JS Sample code of the “Hello World API” using WebStorm
Next, we'll show you how to run the Node JS sample code of the “Hello World API” using WebStorm. WebStorm is a powerful IDE for modern JavaScript development. WebStorm provides full support for JavaScript, TypeScript, HTML, CSS as well as for other frameworks right out of the box, no additional plugins are required and can be downloaded using below link:
https://www.jetbrains.com/webstorm/download
In WebStorm, a project helps you organize your source code, tests, libraries that you use, build instructions, and your personal settings in a single unit.
Step 1 - Launch WebStorm
-
On the WebStorm Welcome Screen, click Create New Project.
Otherwise, from the main menu, select File | New | Project
Step 2 - In the New Project wizard, select Node.js Express App from the list on the left, provide the project Location and click Create.
Step 3 - Create a new Javascript file and named it “helloworld”
Step 4 - Copy the below sample code to the “helloworld.js” file
- Set the below parameters:
var apiKey = '<YOUR API KEY>';
var sharedSecret = '<YOUR SHARED SECRET KEY>';
/*
 * (c) Copyright 2018 - 2020 Visa. All Rights Reserved.**
 *
 * NOTICE: The software and accompanying information and documentation (together, the “Software”) remain the property of and are proprietary to Visa and its suppliers and affiliates. The Software remains protected by intellectual property rights and may be covered by U.S. and foreign patents or patent applications. The Software is licensed and not sold.*
 *
 *  By accessing the Software you are agreeing to Visa's terms of use (developer.visa.com/terms) and privacy policy (developer.visa.com/privacy).In addition, all permissible uses of the Software must be in support of Visa products, programs and services provided through the Visa Developer Program (VDP) platform only (developer.visa.com). **THE SOFTWARE AND ANY ASSOCIATED INFORMATION OR DOCUMENTATION IS PROVIDED ON AN “AS IS,” “AS AVAILABLE,” “WITH ALL FAULTS” BASIS WITHOUT WARRANTY OR  CONDITION OF ANY KIND. YOUR USE IS AT YOUR OWN RISK.** All brand names are the property of their respective owners, used for identification purposes only, and do not imply product endorsement or affiliation with Visa. Any links to third party sites are for your information only and equally  do not constitute a Visa endorsement. Visa has no insight into and control over third party content and code and disclaims all liability for any such components, including continued availability and functionality. Benefits depend on implementation details and business factors and coding steps shown are exemplary only and do not reflect all necessary elements for the described capabilities. Capabilities and features are subject to Visa’s terms and conditions and may require development,implementation and resources by you based on your business and operational details. Please refer to the specific API documentation for details on the requirements, eligibility and geographic availability.*
 *
 * This Software includes programs, concepts and details under continuing development by Visa. Any Visa features,functionality, implementation, branding, and schedules may be amended, updated or canceled at Visa’s discretion.The timing of widespread availability of programs and functionality is also subject to a number of factors outside Visa’s control,including but not limited to deployment of necessary infrastructure by issuers, acquirers, merchants and mobile device manufacturers.*
 *
 */

const express = require('express');
const fs = require('fs');
var https = require('https');
const request = require('request');
const app = express();
const bodyParser = require('body-parser')
var path = require('path');
var crypto = require('crypto');

app.use(express.static(path.join(__dirname, 'public')));
app.use(bodyParser.json());
app.use(express.json());
app.use(bodyParser.urlencoded({extended: true}));


var apiKey = '<YOUR API KEY>';
var sharedSecret = '<YOUR SHARED SECRET KEY>';

var resourcePath = 'helloworld'
var queryParams = 'apiKey='+apiKey;
var postBody = '';

app.get('/', (req, res) => {

   var timestamp = Math.floor(Date.now() / 1000);
   var preHashString = timestamp + resourcePath + queryParams + postBody;
   var hashString = crypto.createHmac('sha256', sharedSecret).update(preHashString).digest('Hex');;
   var xPayToken = 'xv2:' + timestamp + ':' + hashString;

console.log(preHashString);
   console.log(xPayToken);

    var options = {
        hostname: 'sandbox.api.visa.com',
        port: 443,
        uri: 'https://sandbox.api.visa.com/vdp/helloworld?'+queryParams,
        method: 'GET',
        headers: {
            'Content-Type': 'application/json',
            'Accept': 'application/json',
            'x-pay-token': xPayToken
        },
        json: true
    };

console.log(options);

    options.agent = new https.Agent(options);

    request.get(options, (err, res, body) => {
        if (err) {
            return console.log(err);
        }
        console.log(`Status: ${res.statusCode}`);
        console.log(body);
    });
    res.send('Hello World ');
});

app.listen(3050, function () {
    console.log('Example app listening on port 3050.');
})
Step 5 - Compile Your Code
- Simply right click and run “helloworld.js”
- Browse to http://localhost:3050
Want more? Join the Visa Developer Community to get alerts on the latest tutorials, guides and new developer resources. Stay tuned for more in the series.


