How to test and troubleshoot APIs with the Visa Developer Center Playground
We feel that the Visa Developer Center has come full circle since launch in 2016. It hosts many APIs...
In this developer guide, we will show you how to test Message Level Encryption (MLE) enabled APIs using SoapUI.
Before we start with MLE we have to make sure we are connected to the Visa Developer (VDP) Sandbox through Two-way SSL:
Now that we have the basics completed. Let's get started with enabling MLE.
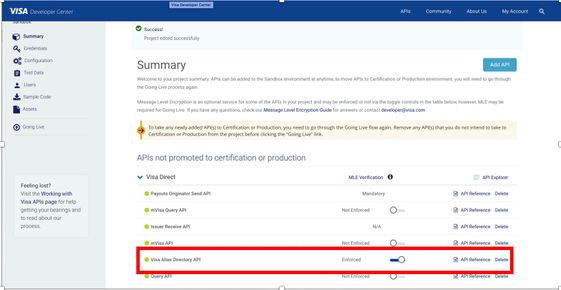
Start by logging in to your Dashboard and go to your project. It's important that we enable MLE for the APIs that need it. If you see "Enforced" under MLE Verification, this means it needs to be active on your project. You do this by toggling the button for which MLE needs to be enforced, see below.
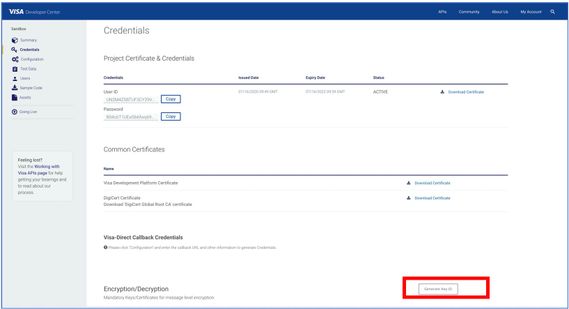
Next, you will need to get Credentials for MLE. Click on the credentials button from the navigation button. Once there click on Generate Key-ID button.
You will then get a Key-ID. Copy it and paste somewhere for your reference. Notice, the status will say PENDING. You will have to ADD CSR to activate this. Click on the ADD CSR link. You'll get the option to Generate a CSR for me (default) or submit my own CSR. Let's chose the default and press confirm. Remember to save your certificate Private Key - you can only do this one time.

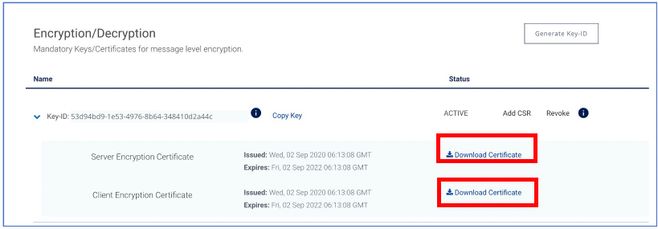
After you've downloaded confirm and click continue. You'll see the status has changed and is ACTIVE. Next to REVOKE click on the info button "i" to download your certificates.
Time to test our connection!
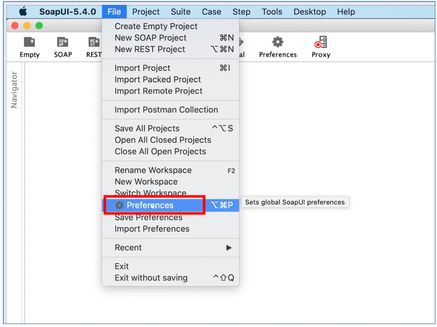
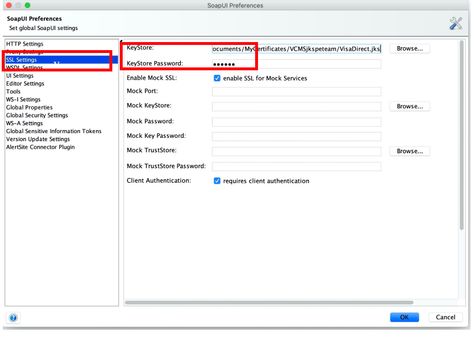
Remember, to generate a P12 file run this command (this is example only):
openssl pkcs12 -export -in cert.pem -inkey "key_8abd1fc0-f70e-42f1-aedf-cb318b923b3b.pem" -certfile cert.pem -out myProject_keyAndCertBundle.p12
And if you need a Java Key Store, run the following Java keytool command to convert your P12 file into a JKS file.
keytool -importkeystore -srckeystore myProject_keyAndCertBundle.p12 -srcstoretype PKCS12 -destkeystore myProject_keyAndCertBundle.jks
Required Jars Names: bcprov-ext-jdk14-1.47.jar, bouncycastle-jce-jdk13-112.jar, common-lang3.jar, nimbus-jose-jwt-8.2.jar, nio_char-src.jar, nio.jar, org.json.jar, slf4j.jar.
|
Jar Name |
Maven |
|
bcprov-ext-jdk14-1.47.jar
|
<!-- https://mvnrepository.com/artifact/org.bouncycastle/bcprov-ext-jdk14 -->
|
|
bouncycastle-jce-jdk13-112.jar
|
|
|
common-lang3.jar
|
|
|
nimbus-jose-jwt-8.2.jar
|
|
|
nio.jar
|
<!-- https://mvnrepository.com/artifact/nio/nio -->
|
|
org.json.jar
|
<dependency>
|
|
slf4j.jar
|
<!-- https://mvnrepository.com/artifact/org.slf4j/slf4j-api -->
|
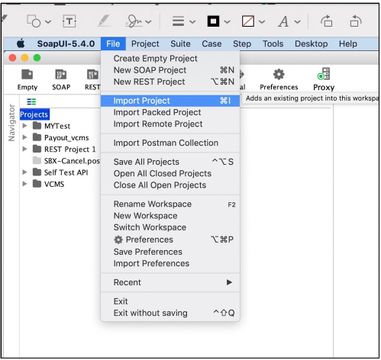

Fully expand the newly created project and navigate to MLETest->TestSuite1->MLEtest->Test Steps->2-Groovy Script-EncryptRequest and do the below mentioned changes:
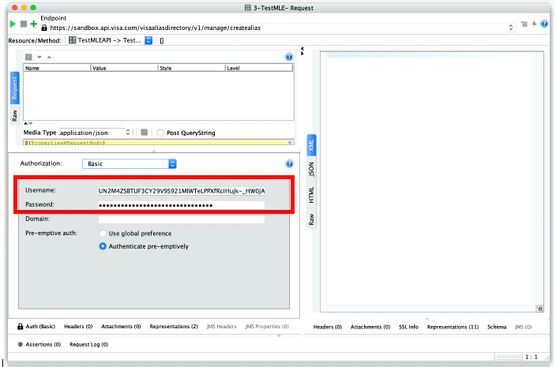
Make sure to add keyId as one of the headers along with other required headers. The value of header keyId will be the MLE key ID of your VDP project.
Input your plain request payload that needs to be encrypted in a file toEncrypt.json which was created as a mentioned in Pre-Requisites.
For this guide, we will test Create Alias API. You can find the request payload to test from the Create Alias API documentation here. We’ve also copied the Sample payload below.
To give some introduction, Create Alias is basically a short linkage of the Primary account number say my PAN can be mapped to email address or phone number as an alias. This linkage will be stored in Alias Directory Service which will be further used in doing financial transactions.
{
"guid": "574f4b6a4c2b70472f306f300099515a789092348832455975343637a4d3170",
"recipientFirstName": "Jamie",
"recipientMiddleName": "M",
"recipientLastName": "Bakari",
"address1": "Street 1",
"address2": "Region 1",
"city": "Nairobi",
"country": "KE",
"postalCode": "00111",
"consentDateTime": "2018-03-01 01:02:03",
"recipientPrimaryAccountNumber": "4895140000066666",
"issuerName": "Test Bank 1",
"cardType": "Visa Classic",
"alias": "254711333888",
"aliasType": "01"
}


This will give you the decrypted response as shown in above screen shot.
There you have it! Hope you find this guide helpful 😀. Please make sure to save this and refer to this guide when testing MLE using SoapUI and if you have any questions comment below, ask in our forums or email us at developer@visa.com - we're here to help.
Have feedback? Share below.
You must be a registered user to add a comment. If you've already registered, sign in. Otherwise, register and sign in.
We feel that the Visa Developer Center has come full circle since launch in 2016. It hosts many APIs...
First time to the Visa Developer Center? Watch this tutorial to learn where to find the Visa APIs th...
Watch the recording of my How to Run a Visa Direct Transaction using Python webinar as you follow al...
Learn how to create a project and where to find test data, credentials and sample code. Leave a comm...