How to test and troubleshoot APIs with the Visa Developer Center Playground
We feel that the Visa Developer Center has come full circle since launch in 2016. It hosts many APIs...
In this "How-to" guide we will show you how to run the “Hello World” project using Visa Hello World API and Two-Way SSL (Mutual Authentication). The Hello World API is a simple API for testing the connectivity with the Visa Network.
Important Links:
Before you are able to run the “Hello World” Project, you must create a Visa Developer Portal (VDP) project and get credentials. If you haven't registered yet just click on register here, fill out the account information, agree to the terms and conditions and click on receive emails. Once you have successfully activated your account, you will see your dashboard and you are ready to go.
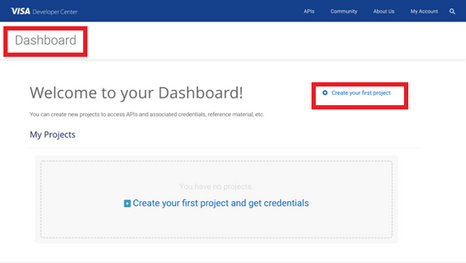
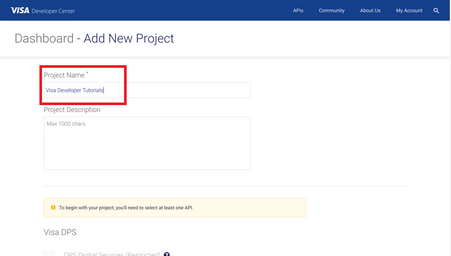
Once you are there, click on create your first project if this is your first project. On the next page, you will be asked for details, such as project name, description and a list of APIs to choose from.
For this tutorial, we're going to select “Visa Direct” and click create project.
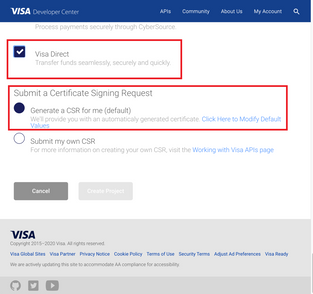
After creating your project, you will be redirected to the project summary page. You can obtain your project credentials by browsing the left side navigation menu of your project and click on “Credentials”.

To be able to make an API call with 2-way SSL authentication, you need to have the following:

Download the project certificate as well as the common certificates - Visa Developer Platform certificate and DigiCert Certificate.

Import an existing SSL certificate and private key to a keystore:
a) Convert the certificate and private key to PKCS 12
Place your private key file (for example: privateKey.pem and your certificate file from VDP (for example: cert.pem in the same directory. Generate a keystore (for example: myProject_keyAndCertBundle.p12) file as shown below.
Note: The myProject_keyAndCertBundle.p12 is only a placeholder file name. You may choose to name it anything else.
> openssl pkcs12 -export -in cert.pem -inkey "privateKey.pem" -certfile cert.pem -out myProject_keyAndCertBundle.p12
b) Run the following Java keytool command to convert your P12 file into a JKS file..
> keytool -importkeystore -srckeystore myProject_keyAndCertBundle.p12 -srcstoretype PKCS12 -destkeystore myProject_keyAndCertBundle.jks -deststoretype PKCS12
c) Run the following Java keytool command to validate the contents of your new JKS file.
> keytool -list -v -keystore myProject_keyAndCertBundle.jks
d) Run the following command to add the root certificate to your JKS file.
> keytool -import -alias ejbca -keystore myProject_keyAndCertBundle.jks -file VDPCA-SBX.pem -storepass <password>
e) Run the following command to add digicert to your JKS file.
> keytool -import -alias digicert -keystore myProject_keyAndCertBundle.jks -file DigiCertGlobalRootCA.crt -storepass <password>
Next, we'll show you how to run the Java sample code of the “Hello World API” using IntelliJ. IntelliJ IDEA is a cross-platform IDE that provides consistent experience on Windows, macOS, and Linux, and can be downloaded here. In IntelliJ IDEA, a project helps you organize your source code, tests, libraries that you use, build instructions, and your personal settings in a single unit.
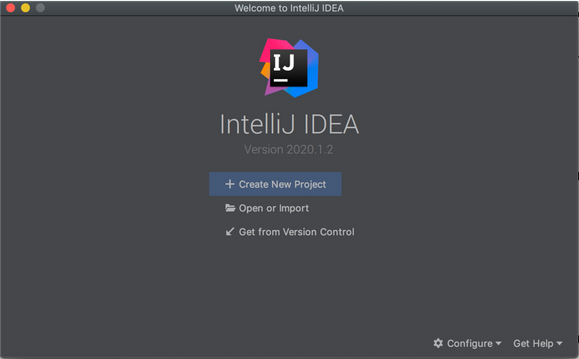
To develop Java applications in IntelliJ IDEA, you need the Java SDK (JDK).
We're not going to use any additional libraries or frameworks for this tutorial, so click Next. Don't create a project from the template. In this tutorial, we're going to do everything from scratch, so click Next.
For example: HelloWorld. If necessary, change the default project location and click Finish.
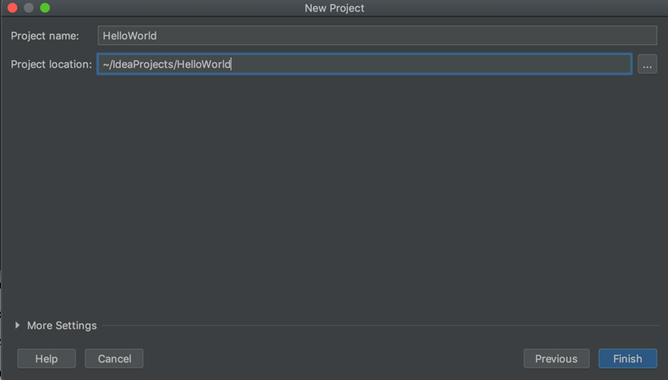
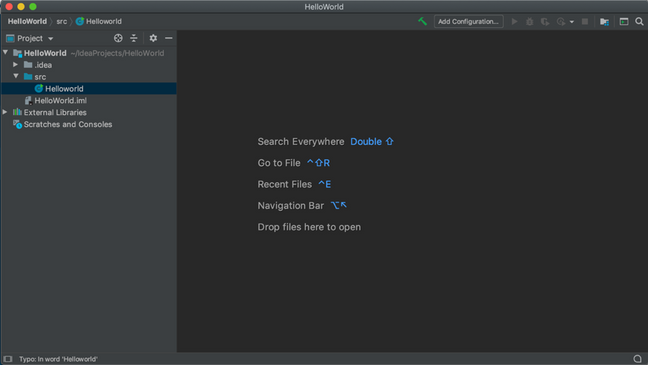
Double click on the file Helloworld.java (if it is not already open) and set the below parameters.
String keystorePath = "<YOUR JAVA KEYSTORE PATH>";
String keystorePassword = "<YOUR KEYSTORE PASSWORD>";
String userId = "<YOUR USER ID>";
String password = "<YOUR PASSWORD>";
/*
 * (c) Copyright 2018 - 2020 Visa. All Rights Reserved.**
 *
 * NOTICE: The software and accompanying information and documentation (together, the “Software”) remain the property of and are proprietary to Visa and its suppliers and affiliates. The Software remains protected by intellectual property rights and may be covered by U.S. and foreign patents or patent applications. The Software is licensed and not sold.*
 *
 *  By accessing the Software you are agreeing to Visa's terms of use (developer.visa.com/terms) and privacy policy (developer.visa.com/privacy).In addition, all permissible uses of the Software must be in support of Visa products, programs and services provided through the Visa Developer Program (VDP) platform only (developer.visa.com). **THE SOFTWARE AND ANY ASSOCIATED INFORMATION OR DOCUMENTATION IS PROVIDED ON AN “AS IS,” “AS AVAILABLE,” “WITH ALL FAULTS” BASIS WITHOUT WARRANTY OR  CONDITION OF ANY KIND. YOUR USE IS AT YOUR OWN RISK.** All brand names are the property of their respective owners, used for identification purposes only, and do not imply product endorsement or affiliation with Visa. Any links to third party sites are for your information only and equally  do not constitute a Visa endorsement. Visa has no insight into and control over third party content and code and disclaims all liability for any such components, including continued availability and functionality. Benefits depend on implementation details and business factors and coding steps shown are exemplary only and do not reflect all necessary elements for the described capabilities. Capabilities and features are subject to Visa’s terms and conditions and may require development,implementation and resources by you based on your business and operational details. Please refer to the specific API documentation for details on the requirements, eligibility and geographic availability.*
 *
 * This Software includes programs, concepts and details under continuing development by Visa. Any Visa features,functionality, implementation, branding, and schedules may be amended, updated or canceled at Visa’s discretion.The timing of widespread availability of programs and functionality is also subject to a number of factors outside Visa’s control,including but not limited to deployment of necessary infrastructure by issuers, acquirers, merchants and mobile device manufacturers.*
 *
 */

import javax.net.ssl.HttpsURLConnection;
import javax.net.ssl.KeyManagerFactory;
import javax.net.ssl.SSLContext;
import java.io.BufferedReader;
import java.io.FileInputStream;
import java.io.InputStreamReader;
import java.net.HttpURLConnection;
import java.net.URL;
import java.nio.charset.StandardCharsets;
import java.security.KeyStore;
import java.util.Base64;

public class Helloworld {

    public static void main(String[] args) throws Exception {

        System.out.println("START Sample Code for Two-Way (Mutual) SSL");
        URL url = new URL("https://sandbox.api.visa.com/vdp/helloworld");

        HttpURLConnection con = (HttpURLConnection) url.openConnection();

        // THIS IS EXAMPLE ONLY how will cert and key look like
        // keystorePath = "visa.jks"
        // keystorePassword = "password"

        String keystorePath = "<YOUR JAVA KEYSTORE PATH>";
        String keystorePassword = "<YOUR KEYSTORE PASSWORD>";
        // Make a KeyStore from the PKCS-12 file
        KeyStore ks = KeyStore.getInstance("PKCS12");
        try (FileInputStream fis = new FileInputStream(keystorePath)) {
            ks.load(fis, keystorePassword.toCharArray());
        }

        // Make a KeyManagerFactory from the KeyStore
        KeyManagerFactory kmf = KeyManagerFactory.getInstance("SunX509");
        kmf.init(ks, keystorePassword.toCharArray());

        // Now make an SSL Context with our Key Manager and the default Trust Manager
        SSLContext sslContext = SSLContext.getInstance("TLS");
        sslContext.init(kmf.getKeyManagers(), null, null);
        if (con instanceof HttpsURLConnection) {
            ((HttpsURLConnection) con).setSSLSocketFactory(sslContext.getSocketFactory());
        }

        con.setRequestMethod("GET");
        con.setRequestProperty("Content-Type", "application/json");
        con.setRequestProperty("Accept", "application/json");

        // THIS IS EXAMPLE ONLY how will user_id and password look like
        // userId = "1WM2TT4IHPXC8DQ5I3CH21n1rEBGK-Eyv_oLdzE2VZpDqRn_U";
        // password = "19JRVdej9";
        String userId = "<YOUR USER ID>";
        String password = "<YOUR PASSWORD>";

        String auth = userId + ":" + password;
        byte[] encodedAuth = Base64.getEncoder().encode(auth.getBytes(StandardCharsets.UTF_8));
        String authHeaderValue = "Basic " + new String(encodedAuth);
        con.setRequestProperty("Authorization", authHeaderValue);

        int status = con.getResponseCode();
        System.out.println("Http Status: " + status);

        BufferedReader in;
        if (status == 200) {
            in = new BufferedReader(new InputStreamReader(con.getInputStream()));
        } else {
            in = new BufferedReader(new InputStreamReader(con.getErrorStream()));
            System.out.println("Two-Way (Mutual) SSL test failed");
        }
        String response;
        StringBuffer content = new StringBuffer();
        while ((response = in.readLine()) != null) {
            content.append(response);
        }
        in.close();
        con.disconnect();

        System.out.println(content.toString());
        System.out.println("END Sample Code for Two-Way (Mutual) SSL");
    }
}

Want more? Join the Visa Developer Community to get alerts on the latest tutorials, guides and new developer resources. Stay tuned for more in the series.
Written by: @shameem, @jmedlen, & @mprsic
You must be a registered user to add a comment. If you've already registered, sign in. Otherwise, register and sign in.
We feel that the Visa Developer Center has come full circle since launch in 2016. It hosts many APIs...
In this developer guide, we will show you how to test Message Level Encryption (MLE) enabled APIs us...
First time to the Visa Developer Center? Watch this tutorial to learn where to find the Visa APIs th...
Watch the recording of my How to Run a Visa Direct Transaction using Python webinar as you follow al...